Redacting a PDF: propose, check, finalize
Placeholder
Written By Logiks Solutions
Last updated About 1 month ago
The important sentence first
Redacting a PDF takes two steps, and only the second actually removes anything.
After the first step there are black boxes over the text – but the text is still in the file. Anyone who clicks the boxes and deletes them, or simply selects and copies the text, has it all back. A PDF from step 1 must not be handed on.
Only Finalize PDF Redactions converts the pages into images. After that there is no text left that could be sitting under the boxes.
The add-in tells you this itself after step 1: "Make sure you review and finalize the redactions before using the PDF (otherwise they can be removed)."
Where to find the features
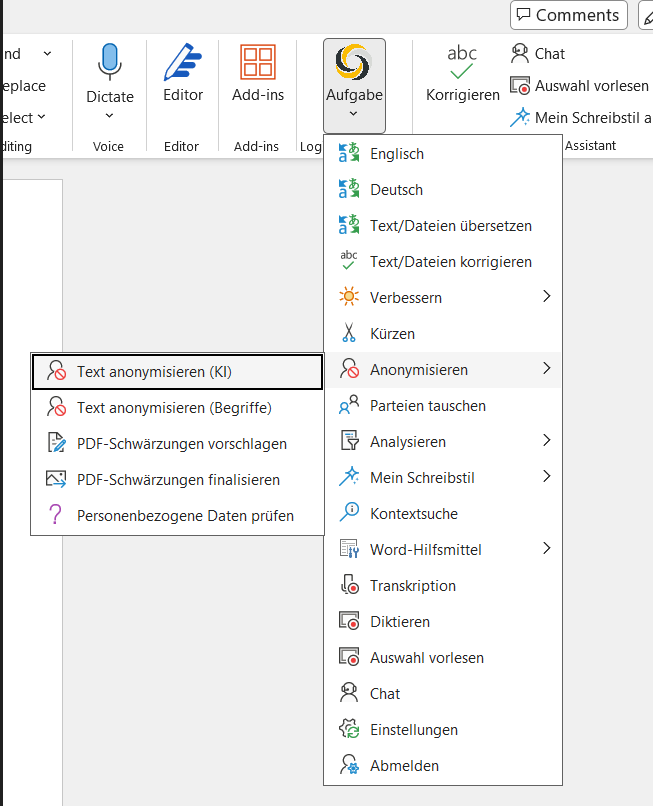
Home tab ▸ Logiks AI Assistant group ▸ Task menu ▸ Anonymize
Three entries belong together there:
Propose PDF Redactions – step 1
Finalize PDF Redactions – step 2
Edit Instructions – the rules redaction works by. This entry only appears once your administrator has configured a location for the instructions; otherwise the menu shows just the other four entries.
Requirement: the PDF must contain text
The feature reads the text out of the PDF to know where things are. A pure scan has no text layer; the add-in then reports: "The PDF appears to contain no extractable text – run OCR with a PDF application first." You need a PDF program for that; the add-in cannot do it itself.
Step 1: propose redactions
You pick a PDF (or a folder of PDFs) and fill in a form:
Prepared instruction set – a stored rule, such as "all personal names and addresses". If there is none, you get the Redaction instructions field directly instead.
Manual instruction (overrides) – your own rule; it takes precedence. Without an instruction nothing proceeds.
Transparent redaction boxes – on by default. The boxes are then red and see-through so you can check what lies underneath. That is exactly what step 1 is for. Unticked they are black and opaque – which looks finished but is not.
Include reason codes – off by default. Writes a reason on each box.
Remove metadata from PDFs – on by default. Strips author, title and similar from the file properties.
Multiple files – a whole folder instead of one file.
Output subdirectory and Output filename extension – where the result is written. The original is left unchanged.
In between: review. Really review.
Open the PDF that was produced and go through it. The AI proposes where to redact – it guarantees nothing. Two kinds of error are to be expected, and one of them is dangerous:
Too much redacted – annoying, but you see it immediately.
Too little redacted – a name that appears again in a footnote, a number in a header, a word hyphenated across a line break. You only see that if you look.
While the boxes are transparent you can check in your PDF program what is underneath, delete boxes, move them, or add your own. Use that.
If the add-in reports "Nothing found to redact." that does not mean there was nothing to redact – it means the instruction matched nothing. Make it more specific and repeat the step.
Step 2: finalize
Only when the boxes are right do you invoke Finalize PDF Redactions. The pages are converted into images and the boxes burned in. After that:
no text in the PDF can be selected or copied – not even outside the redacted parts;
full-text search within the document no longer works;
the file becomes considerably larger.
That is the price of there being nothing left under the boxes. Keep the unredacted original – you will not get the text back out of a finalized PDF.
The parameters for this step:
Multiple files – a whole folder instead of one file.
Include reason codes – writes the reason visibly on the box.
Output DPI – resolution of the generated images, 300 by default. Less makes the file smaller and the text blurrier; more makes it considerably larger.
Output subdirectory and Output filename extension.
At the end the add-in gives you the path of the finalized PDF.
Editing the instructions
Edit Instructions is where you maintain the prepared rules. If the entry is missing from your menu, no location has been configured for them yet – that is something your administrator sets up. The add-in first asks whether you want to edit the local or the central set; if the file does not yet exist it is created.
Local – applies on your machine only.
Central – the shared set. Change it only by agreement; it affects everyone who uses it.
Each line has the form Title|Instruction. Lines starting with a semicolon are comments.
When it does not work
"The selected file is not a PDF – aborting." – the feature works only with PDFs. Save a Word document as PDF first.
"The AI returned an empty response" or "No matching text was found for the identified redactions" – usually temporary; a second attempt often helps. If it persists, the PDF is probably laid out unusually, for instance in multiple columns or with text inside graphics.
"The selected folder contains no PDF files" – in folder mode only the top level is read.
In short
Keep the original safe.
Have redactions proposed, leaving the boxes transparent.
Check the result page by page and correct the boxes.
Finalize.
Open the finalized PDF once more and try to select text. If you cannot, step two worked.
Was this helpful?
Still need help? Ask the team