Correcting text in Word
Fix spelling, grammar, punctuation and word choice in selected text - or correct whole files at once.
Written By Logiks Solutions
Last updated About 1 month ago
What it does
Correct fixes your text linguistically: spelling, grammar, punctuation and unsuitable word choices. Your meaning and your writing style are preserved – only what is wrong gets corrected. You can correct a selection in the document, or whole files.
Before you start
You must be signed in. While you are signed out the Task menu is not greyed out – it is not there at all: the group then shows a single large Sign In button. So if you cannot find the menu, you are probably not signed in.
Where to find it
There is no tab of its own. The add-in inserts a group called Logiks AI Assistant into Word's Home tab, right after the “Names” group. The name appears twice side by side, because there are two groups: one with the Task menu and one with the quick-access buttons.
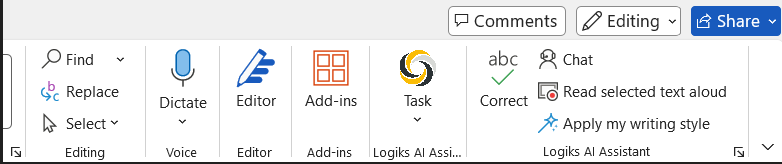
There are two ways to correct:
The Correct quick button – corrects the selected text directly. Word ▸ Home ▸ Logiks AI Assistant ▸ Correct
The Correct Text/Files menu entry – can also correct whole files. Word ▸ Home ▸ Logiks AI Assistant ▸ Task ▸ Correct Text/Files. With the menu open you can also reach it with the key C.
You can switch the interface language under Settings ▸ Interface language.
How to use it
Correct selected text
Select the text you want to correct.
Click Correct – or choose Task ▸ Correct Text/Files.
The corrected text takes the place of your selection. If markup is switched on you see tracked changes instead, which you can accept or reject one by one.
Before:

After:

Correct whole files
Make sure nothing is selected.
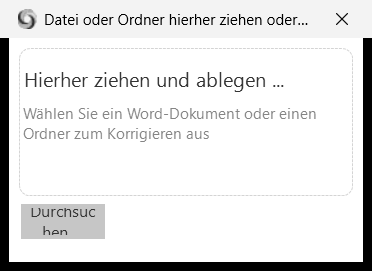
Choose Task ▸ Correct Text/Files. The window “Drag a file or folder here or click Browse” opens.
Drag a Word document or a whole folder into the field – or click Browse and pick either there.
Word works through the files one after another. Press Esc to cancel.
Next to each original you then find two new files: the corrected version with the suffix
_corrected, and a comparison version with the suffix_corrected_compareshowing every difference from the original.
Replace or markup
Replace is the normal case: the corrected text takes the place of the old one.
Markup shows the corrections as tracked changes instead, so you can review each change.
How the markup is produced is set by your administrator. You can override it if another presentation suits you better, or if one takes too long on long texts – see the next section.
A long-running markup can be cancelled with Esc.
What you can set – and what your administrator decides
Some settings are managed centrally and are read-only in the add-in. Those rows are marked accordingly in Settings.
Your administrator decides: model, temperature, timeout, whether markup is used, the markup method, format retention and both of its caps (format retention and diff markup).
You can set: your personal override for the markup method and for replace text. Both fields carry the suffix [override] – leave them empty and the central value applies; enter something and yours does. For the markup method you enter a digit: 1 uses Word's own compare feature, 2 a plain side-by-side, 3 the same in a window of its own. The two preset languages, ß/ss, the dash setting and the location are yours as well.
Limits and messages
Very long text: above the “Maximum text for format retention (characters)” limit the formatting is not preserved – this avoids very long waits. The text is still corrected.
Diff markup: above the “Maximum characters for diff markup” limit the diff method is not used.
“No file selected - aborting.” – you cancelled the file selection.
“The file you provided contained no text - aborting.” – the chosen file holds no readable text. For scanned PDFs this is the normal case: there is no text recognition.
Tips
If you want to review corrections before they land in the text, have them shown as markup instead of replacing.
Related
Was this helpful?
Still need help? Ask the team